How to create a new work schedule in 1c. Part-time work: setting up a schedule and calculating wages. Work schedule for shift work
Let's look at where to find and how to fill out a time sheet in 1C ZUP 8.3. I’ll say right away that you won’t be able to find a time sheet in 1C Accounting 8.3, since it doesn’t exist.
The timesheet is necessary for employees whose salary is time-based. that is, it depends on the actual time worked.
In the program, time worked can be tracked using different methods, or rather two:
- The first method is the “deviation” method. With this method, deviations from the schedule (for example, no-shows or, conversely, overtime) are recorded. Work schedule data is taken as a basis;
- the second method is the “continuous registration” method. Using this method, deviation documents are simultaneously maintained and the actual time spent is recorded.
Work schedule in 1C ZUP 8.3
When an order is created, it is necessary to set up a work schedule - it records the employee’s planned working hours. If there is a personnel change, the schedule must also be indicated (assign a new one or leave the same one). The “Work schedule” attribute is required in reception or transfer documents. Work schedules in the organization are determined in the “Work Schedules” directory.
Get 267 video lessons on 1C for free:
Discrepancies with the schedule in 1C 8.3 are recorded in the following documents:
In the “Time Tracking” section (the “Salary” menu), you can set up an individual schedule for an employee for a certain period. In this case, the time planned by the main schedule will not be calculated for the employee. It will be determined on an individual schedule.
The working time sheet in 1C is not filled out in the following cases:
- When all employees of an enterprise work five days a week.
- When the organization operates several cyclical schedules and there are no deviations, except for time off, vacations, sick leave, etc.
Cases when the timesheet in 1C 8.3 must be filled out:
- When using complex non-cyclical working time schedules.
- When an organization constantly changes shifts between employees working on shift schedules.
- When using shift methods in an organization, and so on.
Working with Time Sheets in 1C Salary
Let's look at step-by-step instructions for entering and setting up a timesheet in 1C 8.3 ZUP.
The accounting timesheet in 1C ZUP is located in the “Salary” menu, then in the “Time Accounting” section, follow the “Timesheets” link to the list of timesheets.
In the list, click the “Create” button. A window for creating a new document will open:

BM-SYSTEMS specialists explained in detail to the readers of Zarplata magazine the features of drawing up work schedules in 1C programs.
Software capabilities to automate the accounting and planning of employee working hours according to various work schedules are provided by the configurations “1C: Salary and Personnel Management 8” and “1C: Production Enterprise Management 8”. Let's consider the sequence of actions for automated scheduling of work in 1C programs.
At the time of creation of materials, such versions of configurations as “Salaries and Personnel Management”, edition 2.5 (2.5.27) and “Manufacturing Enterprise Management”, edition 1.2 (1.2.33) are also relevant.
General list of procedures for drawing up work schedules in the 1C program .
Planning employee working time in 1C software products involves performing a number of sequential actions:
1. Fill out the production calendar (done annually).
2. Enter all the work schedule templates used in the company (this is done when you start working in the program and as new schedules appear).
3. Configure the entered work schedule templates (the settings are performed when entering each new schedule).
4. Fill out work schedules for the coming year (done annually)
5. Assign an appropriate schedule to each employee (done regularly in ongoing HR work).
Let's look at each necessary action in more detail.
Filling out the production calendar
To correctly record employees' working hours, it is necessary to fill out the production calendar annually. Information about public holidays, weekends and pre-holiday days is entered manually on the basis of decrees of the Government of the Russian Federation on the transfer of weekends in the coming year. After entering this information, you can print and check the correctness of completion using the summary data on the number of working and holiday days/hours per month. So what exactly needs to be done? Below is the sequence of actions for filling out the production calendar for the coming year, as well as the view of the working window.
1. Set the period for filling the calendar
2. By clicking on the “Fill by default” button, you can activate the function of automatically filling working time data into the calendar
3. Print and check the result
4. Adjust the data if necessary by clicking on the right mouse button
5. Save your changes.
(Menu Enterprise / Production calendar)
Entering chart templates used in the company
The program allows you to enter various work schedule templates:
Five days;
Six days;
Part-time (reduced) working hours;
Replaceable;
Summarized working time recording schedules;
Schedules by calendar days;
The number of charts that can be registered in the program is unlimited. Below is the sequence of steps to introduce a new template.
1. Add a new work schedule
2. Use the “Chart Filling Assistant” to correctly enter a new schedule
3. Or “Graph Filling Assistant” for a previously entered schedule.
(Menu Company / Opening hours)
Setting up and filling out charts
To set up a work schedule, use the “Schedule Filling Assistant”. The program offers you two options: setting up using an existing template and setting up manually.
Setting up by template. The assistant will prompt you to fill out a chart based on one of the predefined templates:
-- “Five-day 40 hours”: from Monday to Friday - 8 hours, on pre-holiday days - 7 hours;
-- “Six-day week 40 hours”: from Monday to Friday 7 hours, on Sat 5 hours on pre-holiday days, respectively - 7 and 4 hours;
-- “In two days” and “In three days” – shift schedules with a 24-hour shift at a specified frequency starting from the start date. For these schedules, evening and night hours can be provided - 2 and 10 hours per shift;
-- “Calendar days” – every day 8 hours.
note:When creating a schedule using the “Five-day 40 hours” or “Six-day 40 hours” template, holidays are taken into account; in other templates, holidays are not taken into account.
After filling out the template, if necessary, you can adjust the completed schedule manually.
Manual setting. If you need to enter a more complex schedule than those suggested in the templates, when starting the “Graph Filling Assistant”, select the “Manual Configure” method for filling out the schedule. In this case, the assistant will prompt you to configure the following settings:
Let's consider the possibilities of setting chart parameters manually:
1. In the “Schedule type” field, indicate the length of the working week in days – “Five-day” or “Six-day”.
To reflect shift work mode, select the “Shift” schedule type.
If you select the “Calendar days” schedule type, data on working hours will be filled in based on the fact that all days of the year are working days.
2. In the “Hours per week” field, indicate the length of the working week in hours. This parameter is used when converting an employee's monthly or daily rate into an hourly rate, for example, to pay for night hours.
3. When checking the “Summarized working time recording” checkbox, holidays marked in the production calendar are not taken into account.
Checking the box also affects the calculation of some accruals: for example, “Payment based on average earnings” when paying for business trips in this case will use the average hourly earnings, rather than the average daily earnings.
4., 5. The “Keep records of night hours” and “Keep records of evening hours” checkboxes are selected when it is necessary to include night and/or evening hours in the schedule.
The number of night and evening hours per day is determined according to the schedule.
6. The “Take into account holidays” checkbox is selected when, when filling out the schedule, it is necessary to take into account holidays as non-working days.
For the “Five-day”, “Six-day” and “Calendar days” schedule types, on the day before a holiday, working hours are reduced by 1 hour.
For “Shift” schedules, pre-holiday days are not reduced.
7. When you check the “Part-time” checkbox, you must also select the type of part-time: “Part-time” or “Reduced work week”
If you plan to assign a tariff rate to employees working on this schedule based on a full-time work schedule, then you must select the method for calculating the time standard “According to a different schedule” and select a full-time work schedule.
After you fill out all the necessary data, proceed to the next stage of entering information in the assistant by clicking the “Next” button.
Depending on the type of schedule selected in step 1, a certain form for setting up a schedule opens.
If you have selected the “Shift” schedule type, a shift setup form is displayed in which you need to describe the cyclicity of shift work, including weekends. For example, “In a day or two”:
If you have selected the schedule type “Five-day”, “Six-day” or “Calendar days”, a form for entering hours by day of the week is displayed:
If you indicated the need to take into account night and evening hours, the system will prompt you to fill out an extended (detailed) schedule form:
Methodological notes on drawing up work schedules in 1C program configurations were prepared by the HR Accounting and Payroll Automation Department of the BM-SYSTEMS company.
Where to find and how to fill out a work schedule in 1C, features of filling out and setting up non-standard work schedules in 1C: ZUP3.8 - read our article.
The employer sets schedules in accordance with productivity goals for his enterprise. Let's consider their reflection in the program (1C: ZUP).
Where and how to fill out the work schedule in 1C: ZUP 8.3: “five-day week”
To fill out schedules in the program, go to the “Settings” menu - section “Enterprise” - employee work schedules. The “Create” button opens the settings and creation of a new chart. We indicate its name, set the current year and go to the “Change chart properties” menu offered to us.
First, let's look at setting up the schedule in 1C, according to which most Russians work - a five-day week. We indicate:
We fill out the schedule for part-time working in 1C: ZUP 8.3
There are cases when an employee works five days a week, part-time. In this case we:
- create a new schedule, specify the same settings as in the “Five-day” schedule
- check the box "Part-time work"- part-time work (here you can indicate that records are kept for part-time work); and calculate the norm according to another “Five-day” schedule.
- In the tabular part with the work schedule, you must manually indicate the number of hours of work for each day.
We fill out the shift work schedule in 1C: ZUP 8.3
There is accounting by type of time: attendance, night hours and evening hours - they are taken as the basis for drawing up schedules with a shifting nature of work at each enterprise. Let's consider drawing up such a schedule, for example a schedule: day - turnout (12 hours), second day - evening (3 hours) and night time (9 hours), third day - sleep, fourth - day off.
- In the schedule properties, we indicate the filling method “By cycles of arbitrary length (shift schedules)” and the fact that when filling out, you should not take into account holidays; a summary record of working time is maintained; when calculating overtime, determine the norm according to the “Production Calendar”.
- Types of time: if the enterprise keeps records not only of night time, but also of evening time (and in our example such records are kept); check the boxes for “Attendance”, “Night hours” and “Evening hours”.
- In the “Work Schedule” table we indicate the day number “1”: attendance 13; day number "2": night hours 9, evening hours 3; the last two days remain empty (Fig. 2). After clicking the “Ok” button, the graph will be filled in correctly.

There are a large number of ways to compile in the “Salary and HR Management, Edition 3.0” program; you just need to set the correct parameters and fill out the schedule.
Important! Without prepared schedules, employees' salaries will not be accrued. The schedule must be linked to the employee upon hiring, and you can change the schedule to another using the document “Personnel transfer” or “Personnel transfer by list” (to add an employee - on the “Main” tab, check the box “Transfer to another schedule”).
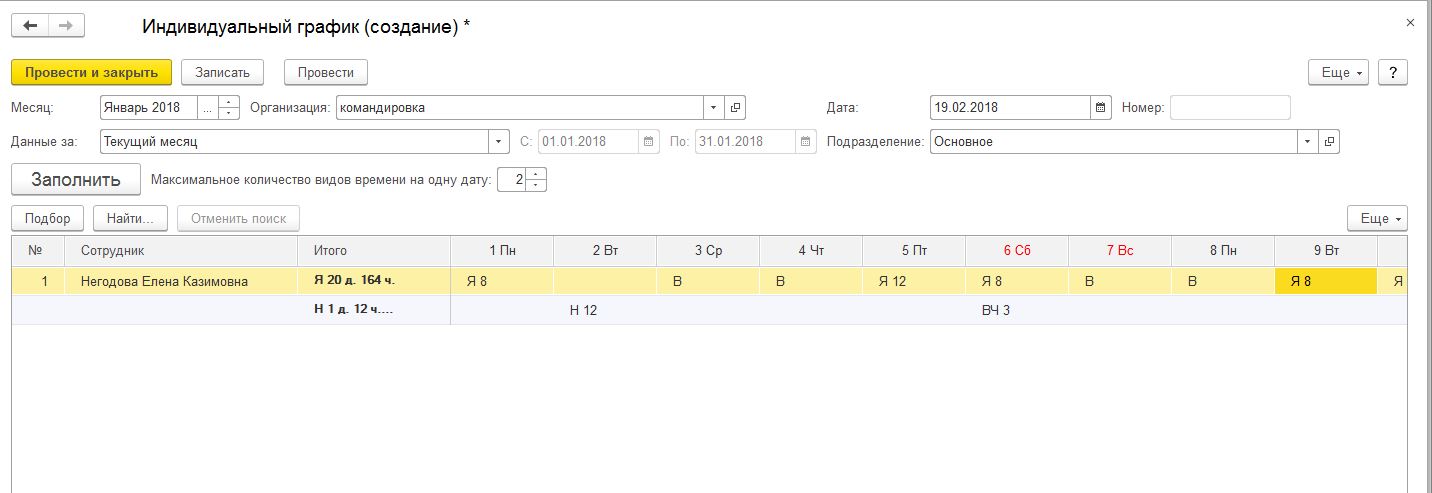
We fill out an individual work schedule in 1C: ZUP 8.3
If an employee does not have a specific, established schedule, that is, working days change monthly, in this case it is recommended to create “Individual work schedules” (menu “Salary” - Time tracking - Individual schedules). In this case, the schedule is filled out manually on a monthly basis: in the upper column we indicate “Attendance” and the number of hours, in the lower part “night” or “evening” time and the number of hours (Fig. 3).
So, we looked at where and how to fill out work schedules in 1C: ZUP 3.8, and made settings for non-standard work schedules in 1C.
If you still have questions about filling out and setting up work schedules in 1C: ZUP 3.8, we will answer you on our website. Our experts not only consult verbally, but also to your 1C working database to help you find an error or configure the 1C program.
Directory Opening hours designed for creating and storing working time schedules used in the enterprise, and serves to set working time standards. There can be an unlimited number of charts, since they are created by the user independently.
The directory is accessed along the path Directories – Enterprise – Work schedules.

To work with directory elements in the list of graphs, a standard set of mechanisms is used (buttons Add, Add by copying, Edit, Mark for deletion).
There should be as many work schedules in the directory as are used at the enterprise, including shortened ones. To create a new chart, use the button Add.

In the form that appears, you must specify the Name of the chart and click the Fill in chart button.
In the Assistant that opens, you need to select the filling method - according to the template or Configure manually. If the chart is filled out according to a template, then you must specify the starting day for the chart periodicity and click the button Further.

The configuration provides for the use of 4 types of work schedules:
- Five days
- Six days
- Removable
- Calendar days
Linking a chart to one type or another makes it easier to fill out. 
Graph type– selected from the list using the [...]

Hours per week– indicates the total number of working hours per week for any type of schedule.
Summarized time tracking– a sign is established that for employees according to this schedule, when calculating sick leave or vacation pay, average hourly earnings will be used.
Keep track of night hours And Keep track of evening hours– it must be noted if the schedule requires taking into account this type of time.
Take into account holidays– if this checkbox is checked, then when filling out the calendar according to this schedule
Part-time work– if the part-time indicator is set, you can select the type of time for this schedule: Part-time or Shortened work week. In addition, for the case of a part-time schedule, in the Full-time Schedule field, which is used in this case:
As a planned (standard) amount of working time, on the basis of which daily (hourly) earnings are determined when paid at a monthly tariff rate;
When calculating average earnings based on accruals (bonuses) taken into account proportionally;
When calculating the limit of average daily earnings from which contributions are deducted, it is divided by the norm of days from a separate (full) schedule).
Work schedule– this field is filled in for five- and six-day work schedules automatically based on the value of the Hours per week field. By default, the start of working hours is 9 hours, the break is 1 hour from 13-00 to 14-00. If necessary, the start time and the number of breaks (and their duration) can be adjusted.

In the start of daytime/evening/night hours fields, you must indicate the start time of the corresponding hours (if you have previously selected their inclusion in the Schedule Options)
Shifts– this field is filled in if shift work schedules are used. In the tabular part, for each time period, using the Add button (called by clicking the right mouse button), a record is created indicating the name of the shift (selected from the Shifts directory, which also indicates the start and end times of the shifts).
Shifts are filled for each day of the cycle. To indicate a non-working day, a new record is created, the number of the day in the shift cycle is indicated, but the Shift field is not filled in. In addition, for the shift schedule, it is necessary to indicate the Start Date from which the filling of shift cycles will begin.
Almost every company has employees who work part-time, or, as they usually say, “part-time.” These are either part-time workers, or students combining work with study, or young mothers who go to work when their child reaches one and a half years...
How to properly hire a part-time employee?
Users who have experience with 1C Salary and Personnel 7.7 put the number of bids = 0.5 in the acceptance order, and then wonder why they take the full salary?
In the G8, everything is not so simple.
In the hiring order, the number of rates indicated is only important for monitoring the staffing table and accounting for occupied staff units. This is not enough for correct payroll calculation.
When hiring an employee part-time, we can either reduce his salary in the admission order (which will allow him to correctly calculate his earnings, but will be methodologically incorrect), or set up a special work schedule for part-time workers.
We set up a work schedule for part-time workers.
Open the “Work Schedules” directory: either on the user’s desktop, the “Enterprise” tab,
or from the main menu of the program, item “Enterprise” -> “Work Schedules”.

In the directory that opens, add a new schedule and call it “Part-time work schedule.”
Click on the “Fill out chart” button. A hyperlink “Change chart filling parameters” appears in the upper right corner.

The form of the graph filling assistant opens, where you are asked to choose how to fill out our graph: using a template or setting it up manually. Select “Configure manually” and click “Next”.

A form for filling out chart parameters opens. Setting up:

We indicate the type of schedule “five-day” (i.e. five working days, two days off).
In the “Hours per week” attribute, we set the standard hours per week.
We check the “Take into account holidays” checkbox - this means that holidays will supersede our schedule and will be considered non-working days for this schedule.
Check the box " Part-time work” and the switch to the “Part-time” position (i.e. we work every day, but shorten our working hours). If you check the “Part-time work week” checkbox, the work mode will automatically be set to two and a half working days and the rest of the time will be weekends.
An important point is the “Time standard is calculated” attribute.
When you click on the “Next” button, a form opens with a schedule according to the configured schedule. We can edit it if desired, remaining within the previously specified hours (in our case - 20, 4 hours for 5 days). If you change the total number of hours and it does not match the norm, the schedule will not be recorded.

Click on the “Fill” button and our schedule will be filled in according to the specified parameters for the whole year.

In most cases of part-time work, the norm will be calculated according to a different schedule. The exception is the 7 hours a day schedule.
Our case is no exception, so we set the switch to the “According to a different schedule” position and indicate the work schedule as a norm - a five-day week (coinciding with the production calendar).
Using the “OK” button, write and close it.
And now it can be assigned when hiring an employee on a part-time basis.

The calculation of accrued salary for January for this employee is as follows:

Those. As we can see, with a normal number of days, 4 hours per day are paid (17 * 4 = 68), as intended.
Thus in the program 1C Salary and Personnel Management 8 adjusts the wages of employees working part-time.
Video tutorial:
 Step-by-step recipes for batter for a pie How to make a pie from poured dough
 What can be prepared from stale bread What can be prepared from rye bread
 Japanese mochi How to cook mochi at home
 Why do you dream of sailing - interpretation of sleep from dream books
 Big Lenormand layout, or aerobatics
 Wax fortune telling: correct interpretation of figures
 Chocolate dipped cakes: recipes with photos and videos