How to find a product by name in 1C. Creating a new item
Using the 1C program, a complete analysis of warehouse load for a specific period is performed; with its help, you can determine and prevent peak days of demand or shortage of commodity items. This information is used by purchasing, sales, warehouse workers and accountants. Before you look at the movement of goods in 1C, you need to check the analytics. The information will be reliable in the context of any warehouse position only if the data is timely entered into the 1C:Enterprise 8.3 program in the 1C: Trade Management edition 11.0 configuration “Taxi” interface.
General overview of working with a warehouse
Working with a warehouse involves processing receipts, sales, movements between warehouses, as well as generating reports on the movement of items for 1C and inventory. In addition, conducting an inventory in all warehouses and recording its results.
Admission
Receipt of items in 1C 8 should be done from the “Purchasing” menu, “Purchasing Documents (all)” tab. To do this, you need to “Create” a new document with the corresponding button.
- Receipt of goods and services from third party suppliers;
- Receipt of commodity items through an accountable person;
- Other income, including gratuitous;
- Correct documents if necessary;
- Return of items or materials;
- All work with invoices.
In any of the created documents, you must fill in the “Basic” tab with the parameters of the supplier, the contract, and select a warehouse. The “Products” tab is intended for selecting specific items.
Before adding a product to 1C, you should check the availability of this item in the directory. Double cards will make it difficult to work with items later, and misgrading may also occur.
To enter a card, you need to create a new item in the “Products” tab using the “Create” button. All information from the card will then be used when generating documents for movement and sale, as well as creating reports, so you need to fill out all the cells accurately.

Analytical data in the “Financial accounting group” cell allows you to select an enlarged product group: finished products, goods, materials accounting in 1C, workwear, intangible assets. According to the selected position, the corresponding accounting entries will be generated.

In the case of a charitable or gratuitous transfer of goods, transactions in 1C are generated by selecting the appropriate “Write off as expenses” tab. This will affect the financial result.

After filling out all the admission information, you can print the document. Depending on the nature of the receipts, select the appropriate receipt report. The “Post and Close” button will complete the posting of goods in 1C, after which all information is reflected in the accounting accounts and reporting forms

Implementation
Sales of goods can be completed in the “Sales” menu in the “Sales documents (all)” field. The format of the document is similar to that of the receipt. The “Basic” tab is intended for displaying general information about the transaction.
- You must select a client from the directory;
- The field “Agreement on terms of sale” is required;
- specify the type of operation;
- select warehouse.
The remaining fields will be filled in automatically from the previously entered data in the directories.

It is more convenient to select a large assortment of goods for UT 11 through the “Fill” tab with the “Selection of goods” button. After selecting specific product items, you should transfer them to the invoice using the “Move to document” button.

After filling out all the tabs and fields, you can print the document. Depending on the type of implementation, the program provides the following printed forms.
- Sales Invoice;
- the act of providing services;
- invoice;
- commodity and consignment note.
The document will appear in the report only after the form is completed and closed.

Goods movement report
After you have received the goods in 1C, you can generate reports on the movement of items. To do this, from the “Warehouse and Delivery” menu, you need to go to the “Warehouse Reports” tab. When you click the button, all available warehouse reports open.

List of goods in warehouses
The general movement of goods in the warehouse can be viewed from the first menu “List of goods in warehouses”.

The report is generated for the organization as a whole. If necessary, you can create it for a specific warehouse. If you check the “Details to” box, information about the source documents will be provided under each item. They can be opened by double-clicking the left mouse button.

Inventory turnover in warehouses
The program provides a report on turnover in 1C “Inventory turnover in warehouses”. Its need can be assessed in large shopping centers or logistics bases, as well as in the presence of several retail outlets. It is formed on the basis of data on the movement of product groups with analysis for a certain period and output of the average daily balance.
Using the report data on product turnover, you can plan deliveries of product groups in a specific period, analyze the seasonality of sales, and quickly respond to market changes in relation to certain items. If necessary, you can make a selection for the entire organization or for a specific warehouse.
If necessary, you can configure the analysis of information in more detail. To do this, in the “Settings” tab, select analytics in quantitative or total terms, set up selection by product group, retail or wholesale price.

Conclusion
The movement of items in 1C can be performed in more detail. If necessary, the filling of the address warehouse with goods and the movement of batches of certain product items are analyzed. The software package provides for maintaining a daily commodity calendar, which reflects current balances and planned receipts. For product groups, it is possible to keep records based on their expiration dates.

In this article I will tell you about the quick search function of 1C Enterprise 8. What is quick search? Very simple. Quick search is one of the ways to navigate large lists of 1C records. These can be lists of documents, directories, registers - everything that is presented in tables.
What is quick search?
The quick search function in 1C Enterprise documents is extremely convenient and allows you not to scroll through huge amounts of data (for example, using the scroll bar), but to immediately go to the desired place in the list. Unfortunately, novice users of 1C Enterprise 8 (including 1C Accounting 8) at first do not use the quick search capabilities, preferring to scroll through lists of documents manually (and they can be Very big). This article will help you understand using quick search in 1C.
First of all, it should be noted that in 1C Enterprise 8 configurations built on managed forms, quick search works differently than in previous versions of 1C. Therefore, we will analyze separately the use of quick search in managed forms and in regular ones.
Quick search in 1C Accounting 8.2
In versions 1C Accounting from 8.0 to 8.2 This function is intended specifically for transition to the desired part of the list. For example, look at the chart of accounts window shown in the figure.
A certain line is highlighted in the window. Pay attention to the subtle triangle of stripes, pointed to by the red arrow. As in other Windows programs where there are lists (for example, in Explorer), the position of this marker (triangle) determines the sorting of the list as a whole - In which column the marker is placed, the entire list will be sorted by that column. In the figure, the marker is in the Code column, therefore the accounts in the chart of accounts will be sorted by code.
The marker can be moved from one column to another by clicking on the desired column ( on the column HEADING!) with the mouse. If the marker is already in the current column, then clicking will change the sorting direction to the opposite (i.e. from large to small or vice versa). This is standard behavior for any Windows program. What is the peculiarity of this marker in 1C Enterprise and how does it relate to quick search?
A quick search in 1C Enterprise 8 lists is carried out by the column in which the marker is located. In this case, a quick search in the chart of accounts will be carried out using the Code column.
There was an important part of the article, but without JavaScript it is not visible!
How to use quick search in 1C? Easily! Just start typing what you want to find in THIS column, i.e. where the marker is. In the example in the figure above, you must enter the account number. For example, you want to find the account 50 Cash. In this case, enter ( No need to click anywhere!) number 50 from the keyboard and if there is an account with that number in this column (and, of course, there is one), then the list will scroll to this line, and the line itself will be highlighted. The result is shown in the chart of accounts screenshot below.

The text the arrow points to is no need to wash afterwards- he will disappear on his own.
In the example above, if you start typing the word “Cashier”, the text at the bottom of the window will be entered and then erased. This happens because as soon as Start the entered quick search string no longer matches the beginning of at least one line in this column, 1C Enterprise concludes that the searched string was not found and automatically erases it. Due to this There are two rules to remember.
In 1C Enterprise 8, a quick search is performed at the beginning of the line, i.e. in a column, a match between the entered text and the beginning of one of the lines in this column is searched.
This leads to an important recommendation: when entering data into directories, name the elements so that they can be conveniently found using a quick search. For example, it is better to write the name of the counterparty as “Firm Name LLC” than “Firm Name LLC”. And even more so, you should not use quotes and other unnecessary symbols in the name (we are talking about filling out the Name field in forms).
If you start typing text and it gets erased, what you are looking for is not in this column! In this case, check the input language, as well as the column in which the quick search is performed. A typical mistake is that the wrong column is selected. For example, the marker is set in the Code column, and the search is performed by the account name.
Quick search in 1C Accounting 8.3
Now let's see how quick search differs in version 1C Enterprise 8.3. Usage is largely similar to version 8.2, but there is one major difference to remember.
In 1C Accounting 8.3, as well as in any other configurations on managed forms (the same new interface), it works as a filter. Simply put, as a result of the quick search function, part of the list hiding.
We will now find out how to use this. First, look at the screenshot of the 1C Accounting 8.3 chart of accounts window below.

As you can see, the same marker is in one of the columns. The search is also carried out in the column in which the marker is installed. This all remains unchanged. However, if you start entering text (in the example, the account number), the following will happen.

As you can see, the search window simply opened automatically. The exact same window will open if you click on the search button on the window toolbar (underlined in the figure). As a result, when you click the Find button in the search window (hidden behind the drop-down menu in the picture) or simply Enter, you get the following result.

From this it is clear that quick search in 1C Accounting 8.3 simply leaves visible the part of the list that satisfies the search conditions. In this case, the Find button disappears, and instead of it a lens with a cross appears (underlined in the figure), when clicked, the list returns to its original state (the line found as a result of a quick search remains highlighted).
Another important feature of quick search in 1C Accounting 8.3— a match is not searched for at the beginning of the line, as in version 8.2, but a match is searched for a match with any part of the lines in the column. Thus, if you name the counterparty “Firm Name LLC”, and when searching, start entering “Firm Name LLC”, then the line will still be found!
Drawing conclusions
Thus, quick search in 1C Accounting 8.2 and earlier versions is intended to scroll the list to the desired line, and in 1C Accounting 8.3 quick search works like a regular filter, hiding the part of the list that you do not need.
Find directory item in 1C 8 possible in three ways:
1) Search by code
If known code directory element, and you need to get a link to it, you can use the method FindByCode(<Код>, <ПоискПоПолномуКоду>, <Родитель>, <Владелец>) code directory element and the result will be either a link to the directory element or an empty link if an element with such a code is not found. It should be noted that if the directory contains several elements with the specified code, the one found first will be returned.
FoundElement = Directories.Nomenclature.FindByCode("00000011254" );
Description of method parameters FindByCode:
- <Код>(required). Type: Number, String. Description: the required code, string or number, depending on the directory settings in the configurator.
- <ПоискПоПолномуКоду>(optional). Type: Boolean. Description: defines the search mode by full code, true - the searched code should be specified as a string consisting of a sequence of codes by directory levels, separated by the “/” symbol. Default value: False.
- <Родитель>(optional)
- <Владелец>(optional)
2) Search by name
If known Name directory element and you need to get a link to it, you can use the method FindByName(<Наименование>, <ТочноеСоответствие>, <Родитель>, <Владелец>) directory manager. In the simplest case, you need to pass to this method Name directory element and the result will be either a link to the directory element or an empty link if an element with the same name is not found. It should be noted that if there are several elements with the specified name in the directory, the one found first will be returned.
FoundElement = Directories.Nomenclature.FindByName( "Welding machine");
Description of method parameters Find By Name:
- <Наименование>(required). Type: String. Description: A string containing the name you are looking for.
- ExactMatch> (optional). Type: Boolean. Description: defines the search mode by full match, the search will be successful if the search string: in the case of the parameter value Lie- will correspond to the left side of the name, in the case of the parameter value True- will completely coincide with the name (with the exception of “tail” spaces in the name). Default value: False.
- <Родитель>(optional). Type: DirectoryLink. Description: the parent within which the search should be performed; if not specified, the search will be carried out in the entire directory.
- <Владелец>(optional). Type: DirectoryLink. Description: the owner within which the search should be performed; if not specified, the search will be carried out in the entire directory.
3) Search by arbitrary details
If the meaning of any props directory and you need to get a link to it, you can use the method FindByDetails(<ИмяРеквизита>, <ЗначениеРеквизита>, <Родитель>, <Владелец>) directory manager. In the simplest case, you need to pass the name of the attribute and its value to this method, and as a result you will receive either a link to a directory element, or an empty link if an element with such a value of the specified attribute is not found. It should be noted that if there are several elements in the directory with the same value of the specified attribute, then the one found first will be returned.
FoundElement = Directories.Nomenclature.FindByRequisites("Article","A-255");
Description of method parameters FindByProps:
- <ИмяРеквизита>(required). Type: String. Description: the name of the attribute, as it is specified in the configurator, by the value of which the search is carried out. Value type: arbitrary, except for ValueStorage and arbitrary-length strings.
- <ЗначениеРеквизита>(required). Type: Free. Description: the value of the attribute by which the search should be performed.
- <Родитель>(optional). Type: DirectoryLink. Description: the parent within which the search should be performed; if not specified, the search will be carried out in the entire directory.
- <Владелец>(optional). Type: DirectoryLink. Description: the owner within which the search should be performed; if not specified, the search will be carried out in the entire directory.
When working with 1C programs, users constantly create documents to reflect various transactions with goods: purchase, sale, movement, inventory, etc. In all documents, the user must indicate a list of goods. When the company's product range is large enough, filling out documents can take a lot of time.
In the program “1C: Trade Management, ed. 10.3" in all documents a mechanism for selecting goods is implemented, allowing you to fill out documents quickly and conveniently. Let's consider the operation of this mechanism using the example of the “Buyer’s Order” document.
Menu: Documents - Sales - Customer orders
Let's create a document and indicate in it the organization, warehouse and counterparty:
Next, you need to fill out a list of ordered goods, their quantities and prices. You can add new rows to the table, select items in them and indicate the quantity, but this option is quite complicated.
Click on the “Selection” button to open the selection window:

The selection window looks like this:

The selection window consists of several parts.
At the top you can select the selection method, specify the item group and search for items.

Below is a list of all nomenclature groups from the directory:

You can place the cursor on the group of products you need, and the selection window below will display products from the selected group.
Under the groups there is a list of products and some additional settings.
When working with selection, you can choose one of the options:
- According to the reference book. All products from the directory are displayed, regardless of their availability in the warehouse.
- According to the remainder of the nomenclature. Only those products that have a balance in stock are displayed. The list of products displays additional columns with the total stock balance and free stock.

- At item prices. Only those products with sales prices are displayed. The list of products displays an additional column with the price.

- According to item balances and prices. This option combines the options “by item balances” and “by item prices.”

We will establish a selection based on the remaining items. To find the product you need, you can use the search field at the top. You can search for a product by name, article number, code and barcode.
Select the search option by article and indicate the required article. The program will find a product with this article and position it in the product list:

To add a found product to a customer’s order, you just need to double-click on it. In this case, the program will add a line with the desired product to the order, indicating the quantity - 1 piece. and set the price (if it is set in the database).

Double-clicking on the product again will increase the quantity in the line to 2 pieces. Those. if an item is already in the order, it is not added again, and the quantity of the item in the order is increased.
When adding a product to an order, you can specify the required quantity and price. To do this, set the “Request quantity” and “Request price” flags below:

In this case, when you double click on the product, a special window will open for entering quantity and price:

Buyer order after adding fan:

If a product is kept accountable by characteristics, then you can also set the “Request characteristics” flag there. With this setting, when you double click on a product, the program will open a window for entering the quantity and price for each product characteristic:

The quantity field indicates the quantity of goods with this characteristic that needs to be added to the order. And in the price field - the price of a product with this characteristic.
Buyer's order after adding women's sandals:

Thus, you can use the selection, search for the necessary products and quickly add them to documents, indicating the quantity and price. You can open the selection window in any document that contains a list of products. All settings made in the selection are saved in the program (separately for each user and type of document).
Nomenclature in 1C 8.3 means materials, semi-finished products, equipment, services, returnable packaging, workwear, etc. All this data is stored in the Nomenclature directory. You can get to it from the “Directories” section, subsection “Goods and Services”, item “Nomenclature”
You will see a list of directory positions that has a multi-level hierarchical structure.

In this article we will take a step-by-step look at all the instructions for initially filling out items in 1C 8.3 using an example
For ease of use of this reference book, 1C Accounting uses groups (folders). They combine nomenclature that has common characteristics. In each group, in turn, it is possible to create subgroups (similar to the file system on a computer). The number of hierarchy levels is set by the programmer, but initially there are no restrictions.
Let's create a new group. In the list form of the “Nomenclature” directory, click on the “Create group” button.

Specify the name of the group to be created. You can also fill in its type, but it is not necessary.

As you can see in the figure below, the group we created was placed in “Materials”. If you need to move it to another group or to the root, open the context menu and select “Move to group”. A window will open where you will need to specify a new location.

Creating a new item
Let's move on to adding the nomenclature itself. To do this, in the directory list form, click on the “Create” button. A card of the new item will open in front of you.

Fill in the “Name” field. The value in the “Full name” field will be entered automatically. Please note that the full name is displayed in reports, printed forms of documents, price tags, etc. The “Name” field is used for convenient search of items in the program.
If necessary, fill in the remaining details:
- The “Item type” and “Included in group” fields are filled in automatically from the data of the group in which the new item item is created. They can be changed if necessary.
- The value in the “Unit” field is the storage unit for the balances of this item.
- The tax rate specified in the “% VAT” detail can, if necessary, be changed during the generation of documents.
- "Sales price" is indicated by default on sales documents. This setting can be changed by clicking on the hyperlink “?” next to this field.
- In the “Production” section, you can indicate the cost item for a given item and its specification (for finished products), in other words, the composition.
- Depending on the specifics of the nomenclature, the remaining sections, such as “Alcohol products” and “Imported goods”, are filled in.
After you have filled out the card for the item you are creating, you need to write it down.
What is the type of item in 1C 8.3 and how to configure them
In order to configure the types of nomenclature, click on the corresponding hyperlink in the list form of the “Nomenclature” directory.

Nomenclature types are necessary to separate item items. Each type can be assigned its own. It is very important to avoid the presence of duplicates in this directory, which can lead to incorrect operation of item accounting accounts.
When installing a standard configuration from the supplier, this directory will already be filled in with the main types of items. If the item type is a service, do not forget to put the appropriate flag when creating it.

Item accounting accounts in 1C 8.3
To generate accounting entries, you need to set up accounting accounts. This can be done from the list form of the “Nomenclature” directory by clicking on the “Item Accounting Accounts” hyperlink.

In the standard configuration of 1C Accounting 3.0, this register is already filled. But if necessary, it can be adjusted manually.
Accounting accounts can be configured:
- according to a specific nomenclature item;
- by nomenclature group;
- by type of nomenclature;
- by warehouse;
- by warehouse type;
- by organization;
- throughout the nomenclature, specifying an empty link as the value.

If different accounting accounts were configured for a specific item and for it, then the account will be taken from the item. In such cases, consolidated accounts have lower priority.
Setting item prices
One item can have several prices. They differ in types, such as wholesale price, retail price, etc.
Go to the “Nomenclature” directory element card and follow the “Prices” hyperlink.

A list will open in front of you, in which you can for a specific type on a specific date. Simply indicate the price in the appropriate column and then click on the “Record prices” button. An item price setting document will be created automatically, and you will see a link to it in this list.

Watch also the video about nomenclature:
 Stary Oskol city socio-political newspaper
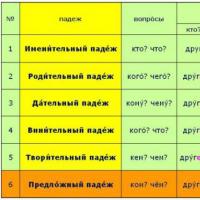 Lesson "three types of noun declension" Types of noun declension in Russian
 Fundamentals of Maxwell's theory for the electromagnetic field Maxwell's electromagnetic field
 How does one get reinstated in the queue for improved housing conditions after being removed from the city queue?
 Actions upon the occurrence of an insured event under compulsory motor insurance insurance insurance insured events
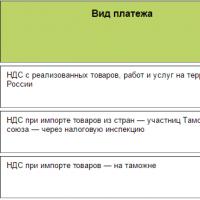 Procedure and terms for payment of VAT VAT for the 4th quarter term
 Veloute Dubarry soup – Velouté Dubarry Dubarry salad recipe